
How To Install Jenkins on Windows
Jenkins is a Java based open-source application, which is one of the most popular tools for continuous integration and continuous delivery on any platform.
Jenkins is a self-contained server that can be used to automate all sorts of tasks related to building, testing, and delivering or deploying software. It has many plugins for automating almost everything at the infrastructure level. The use of Jenkins has widely increased due to a rich set of functionalities, which it provides in the form of plugins.
The Jenkins project has two release lines: Stable (LTS) and regular (Weekly). Depending upon the scenario and need, one can be chosen:
Jenkins can be installed through native system packages, Docker, or even run standalone by any machine with a Java Runtime Environment (JRE) installed.
In this tutorial, we will show a step-by-step guide on how to install Jenkins on a Windows platform.
This document can be referred by anyone who wants to install the latest Jenkins version on Windows.
Before proceeding further with the installation, make sure your system satisfies the following requirements:
Recommended hardware configuration for a small team size
Jenkins project performs a full test flow with the following JDK/JREs:
For more details refer to the Java Requirements official document.
Web browser
For more details, you can check Web Browser Compatibility page.
Below are the steps of JDK installation, if not installed initially:
STEP 1: Navigate to the website. Scroll to Java SE11 (LTS) and click on JDK Download.

STEP 2: Scroll to Java SE Development kit 11.0.10 and click on Windows x64 Installer.

STEP 3: Accept the Licence Agreement and download it.

STEP 4: You will be navigated to the Sign in page. If you don’t have an account on Oracle, click on create account and proceed with the download.

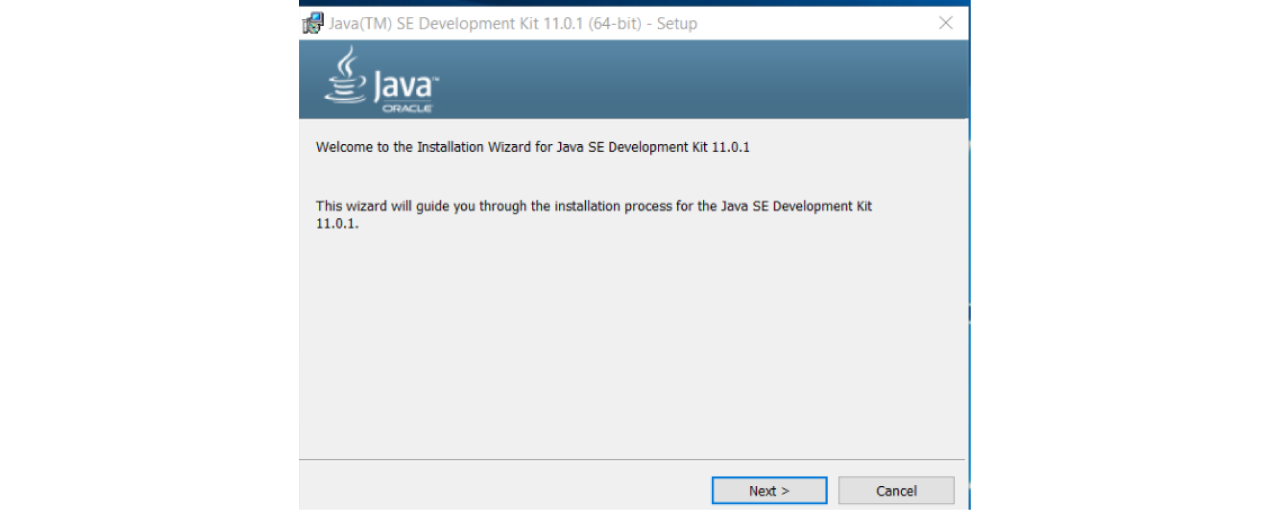
STEP 5: Once downloaded, run the .exe to install JDK by double-clicking it. It might ask for permission before installation. Click on Yes to allow installer to execute. The Welcome Screen comes first.
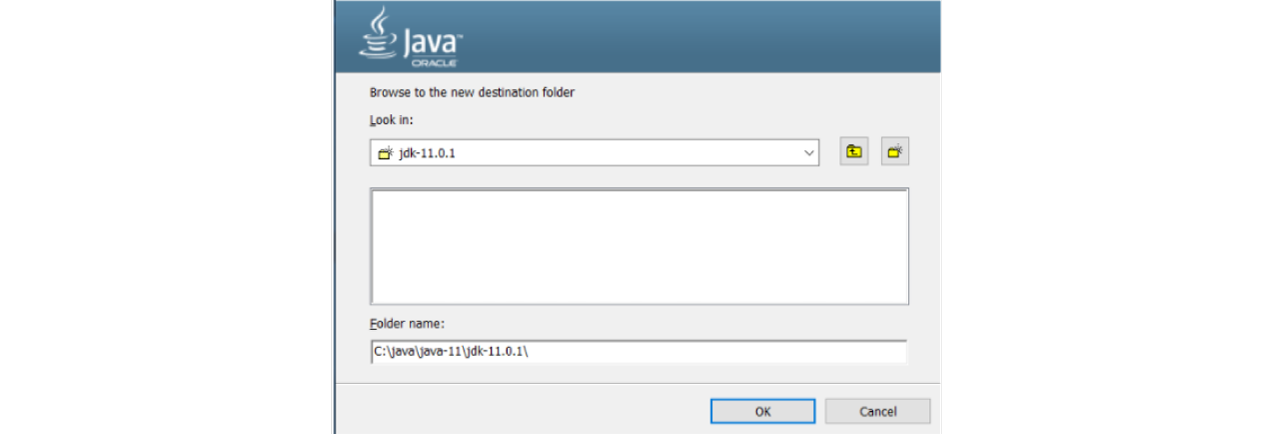
STEP 6: Choose the installation path for jdk and click Ok. We can also choose the default path as well.
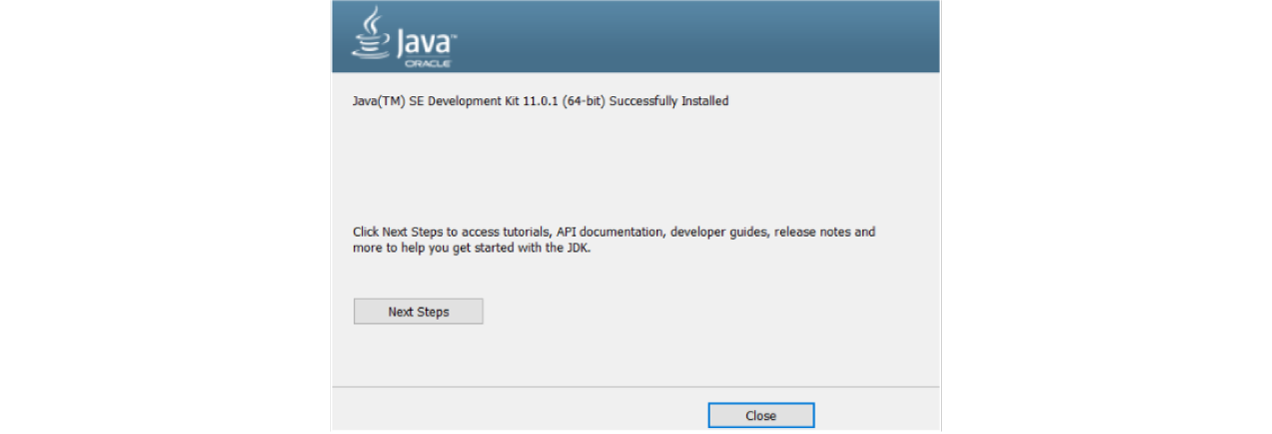
STEP7: Click on NEXT to start installation. Once it is completed it shows the success message as shown in the image below.
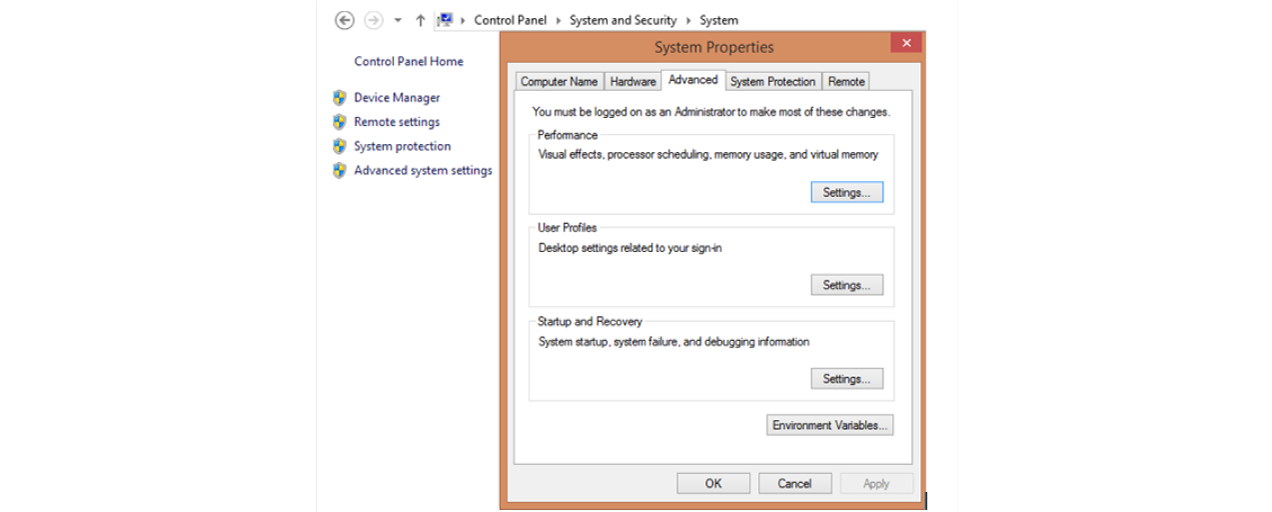
It is recommended to restart your system, further click on System Properties and choose Advance System Settings.
STEP 8: Choose the Environment Variable and set the User variable by assigning Variable name as JAVA_HOME and variable value as the path where Java is installed:

Click on Ok and then Apply.
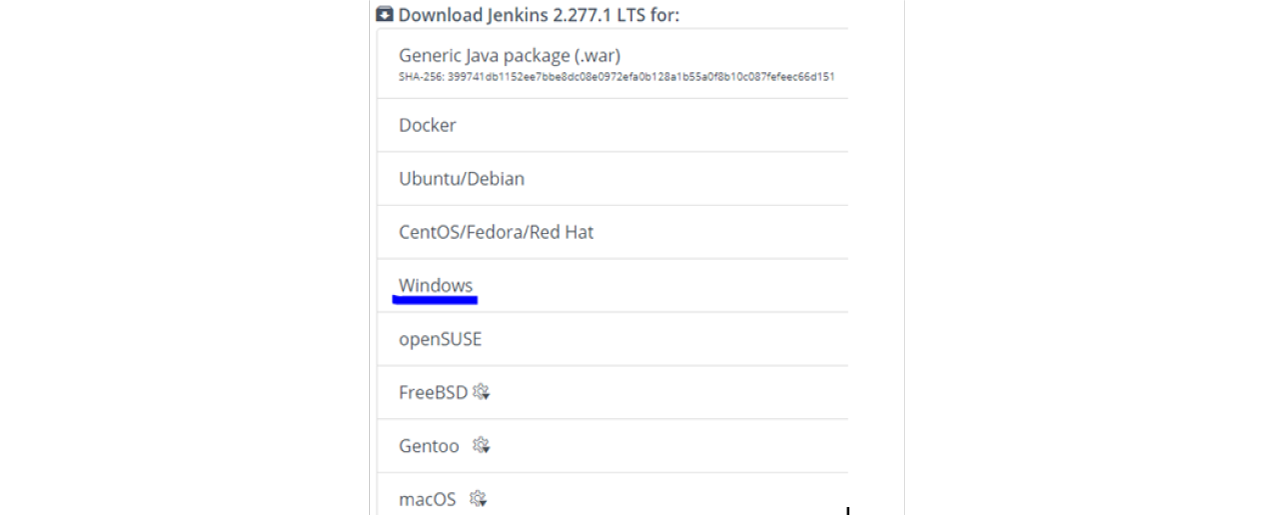
STEP 1: Navigate to the website and under Jenkins LTS system, click on Windows for the latest Jenkins package (currently it is 2.277.1)
STEP 2: Once the jenkins.msi is downloaded, open it and proceed.

STEP 3: Choose the Jenkins path.

STEP4: For Service logon credentials, choose Logon type as “Run Service as LocalSystem”.

STEP 5: Choose the port available on the system and test it (recommended is 8080).

STEP6: Choose the JDK path and click Next.

Click on “Next”

STEP 7: Click the ”Install” button to start the installation process.

STEP8: Please wait till the whole installation is completed.

STEP 9: Click on “Finish” after the installation is completed.

STEP 10: You will be redirected to a local Jenkins page by default. If page is not loaded by default, paste the URL http://localhost:8080 , with the chosen port in the browser.
After completing the Jenkins installation phase, we will proceed with its configuration set up.

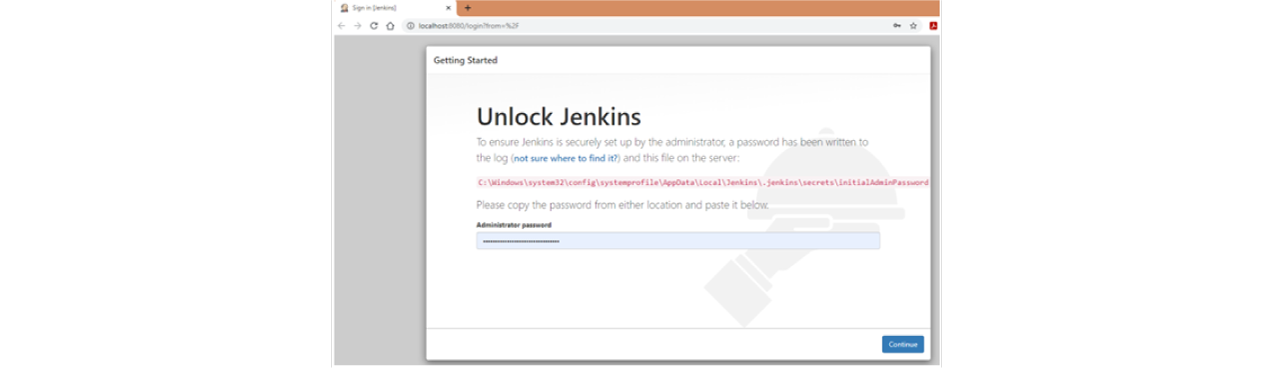
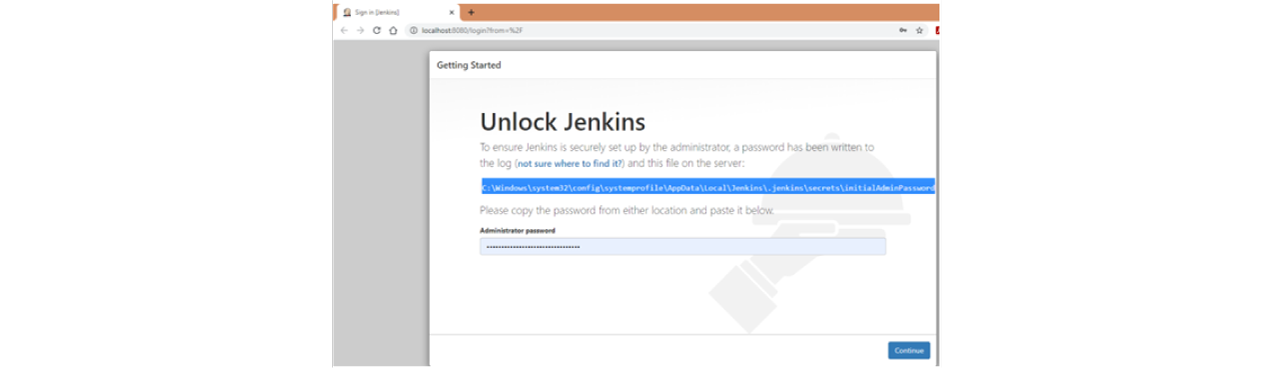
STEP 11: For Unlocking Jenkins, copy the password from the file at C:WindowsSystem32configsystemprofileAppDataLocalJenkins.jenkinssecrets (shown on screen) and paste it in the Administrator password field. Click on Continue.


STEP 12: We can either choose the Jenkins suggested plugins or manually select plugins to install. It’s preferable to choose “install suggested plugins”. If not, we can install this later as well.

STEP 13: Choose “Install suggested plugins” and let the plugins install completely.

STEP 14: If you choose the Option “Select Plugins to Install”, then select the plugins you want to install.

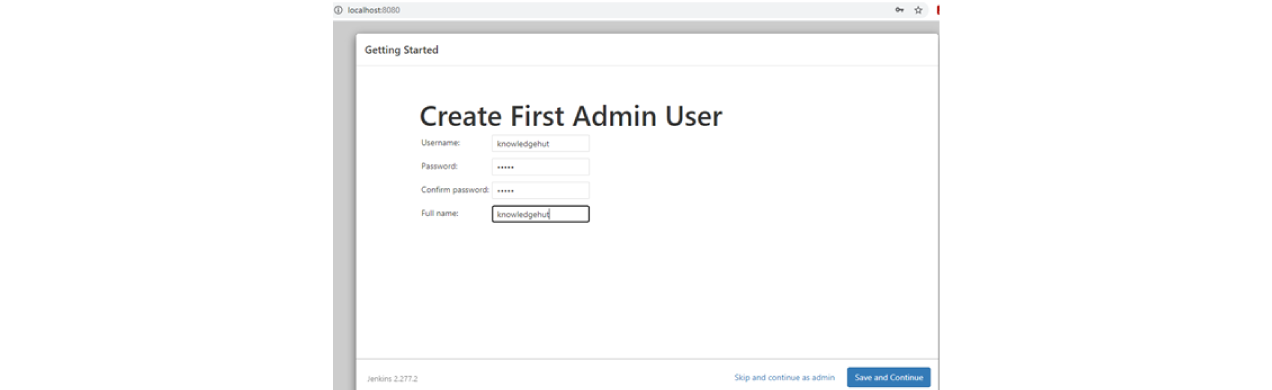
STEP 15: Create an admin user account by filling up the details.
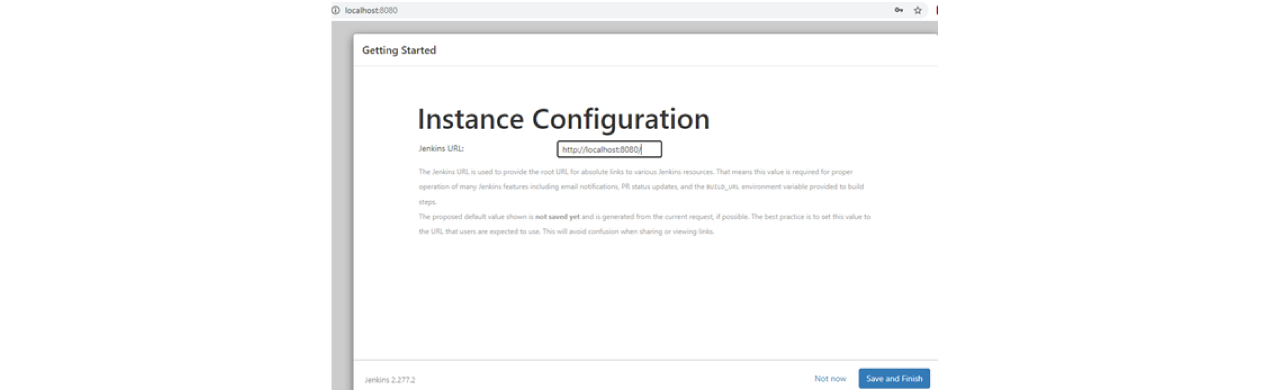
STEP 16: Click Save and Finish to complete the Jenkins set up.
STEP 17: Click ”Start using Jenkins” option.

STEP 18: Finally, the default Jenkins page will be shown as below.

STEP 19: Once we login as Admin, we can create multiple users for the team by choosing Manage Jenkins >>Manage User >> Create User; and completing the details.

For installing plugins, there are basically two methods. One is to directly download from the Available Section of the Manage Plugin.
Second, uploading the .hpi file. This method is generally used when an application/software plugin is not available for ready download.
Find below the steps for same:
Method 1:
1. Navigate to the left side menu and choose Manage Jenkins and then Manage Plugins.

2. Under the Available section, enter the name of the plugin in the search bar and click on ‘Install without Restart’.

Method 2
1. Navigate to left side menu and choose Manage Jenkins and then Manage Plugins.

2. Under the advanced section, scroll down to the Upload Plugin section.

3. Upload the .hpi file for the plugin (you can get the .hpi file from the official website of application/software.)
1. Under the Manage Plugin section, sometimes we see error as:
There were errors checking the update sites: SSLHandshakeException: sun.security.validator.ValidatorException: PKIX path building failed: sun.security.provider.certpath.SunCertPathBuilderException: unable to find valid certification path to requested target
For this, certificates need to be installed. Follow the below steps (In Chrome browser):
Or, navigate to the Advanced tab in the Manage Plugin section. Scroll to Update site and replace https to http in URL mention.

2 . After installation, if Jenkins URL is not loading up and shows below error:

There could be a possibility that the JDK version is not correct as per requirement.
To verify, open command prompt and type java –version.
You can use the JDK installation steps mentioned above in Pre-requisites.
3. There could be a scenario where we need to configure more than one version of the JDK. In the pipeline, there may be a different environment(prod/qa/pre-prod) running and subsequently requiring different version of JDK. One of the best suited methods is to build the application using the java version which is close to the version used in the prod environment; as a lower JDK version can work with a higher version, but the reverse is not always true.
For resolving the issue, we can install JDK version on Jenkins by navigating to Manage Jenkins >> Global Tool Configuration>> Add JDK.

We can click on Add Jenkins, provide name and JAVA_HOME. Once the path of JAVA_HOME is entered, Jenkins will validate whether the installation directory exists for the specified JDK versions.
Click on Install automatically, and Jenkins will download and install the specified version of the JDK into the tools directory of the Jenkins home directory.

After all the settings for configuring the JDK are done, click Save at the bottom of the page to save the configuration.
There are multiple methods to uninstall Jenkins from Windows.
It can be done by using command prompt or using .msi file.
Below are the steps for uninstalling Jenkins and its slave services:
STEP 1: Simply go to the directory where Jenkins is installed.
STEP 2: Then open up a cmd in that directory. (cmd in administrator mode is preferable)

STEP 3: jenkins.exe uninstall (this name could be different in case of slave Jenkins services like jenkins-slave.exe or something similar. The application will be present in the folder)
For Jenkins as services, do the same thing. At the end we can delete the directories (e.g. C:Program Files (x86)Jenkins or wherever Jenkins was installed)

STEP 1: Navigate to the path where the .msi (Windows Installer) file which we used to install Jenkins has been placed. In general, it will be in .zip folder of Download, but it may vary.

STEP 2: Double-click the .msi file inside the compressed folder.
Note: Don’t extract the file.
STEP 3: Since Jenkins is already installed, Windows Installer will give you options to customize it or uninstall it.
STEP 4: Choose “Uninstall.” option
STEP 5: Once uninstalled, delete the installation folder (e.g. C:Program Files (x86)Jenkins or wherever Jenkins was installed)

Conclusion
Since Jenkins has been installed and the basic configuration is completed, you can proceed with creating a continuous integration pipeline. If you want to know more about Jenkins, you can check out the Jenkins Certification Training Course and learn about server automation, continuous integration, and configuration tools. You can also check out our other blogs on DevOps.
keytool -import -alias example -keystore “< JAVA PATH/cacerts >” -file example.cer
Research & References of How To Install Jenkins on Windows|A&C Accounting And Tax Services
Source